Sunday, September 30, 2018

IC 5146 - The Cocoon Nebula


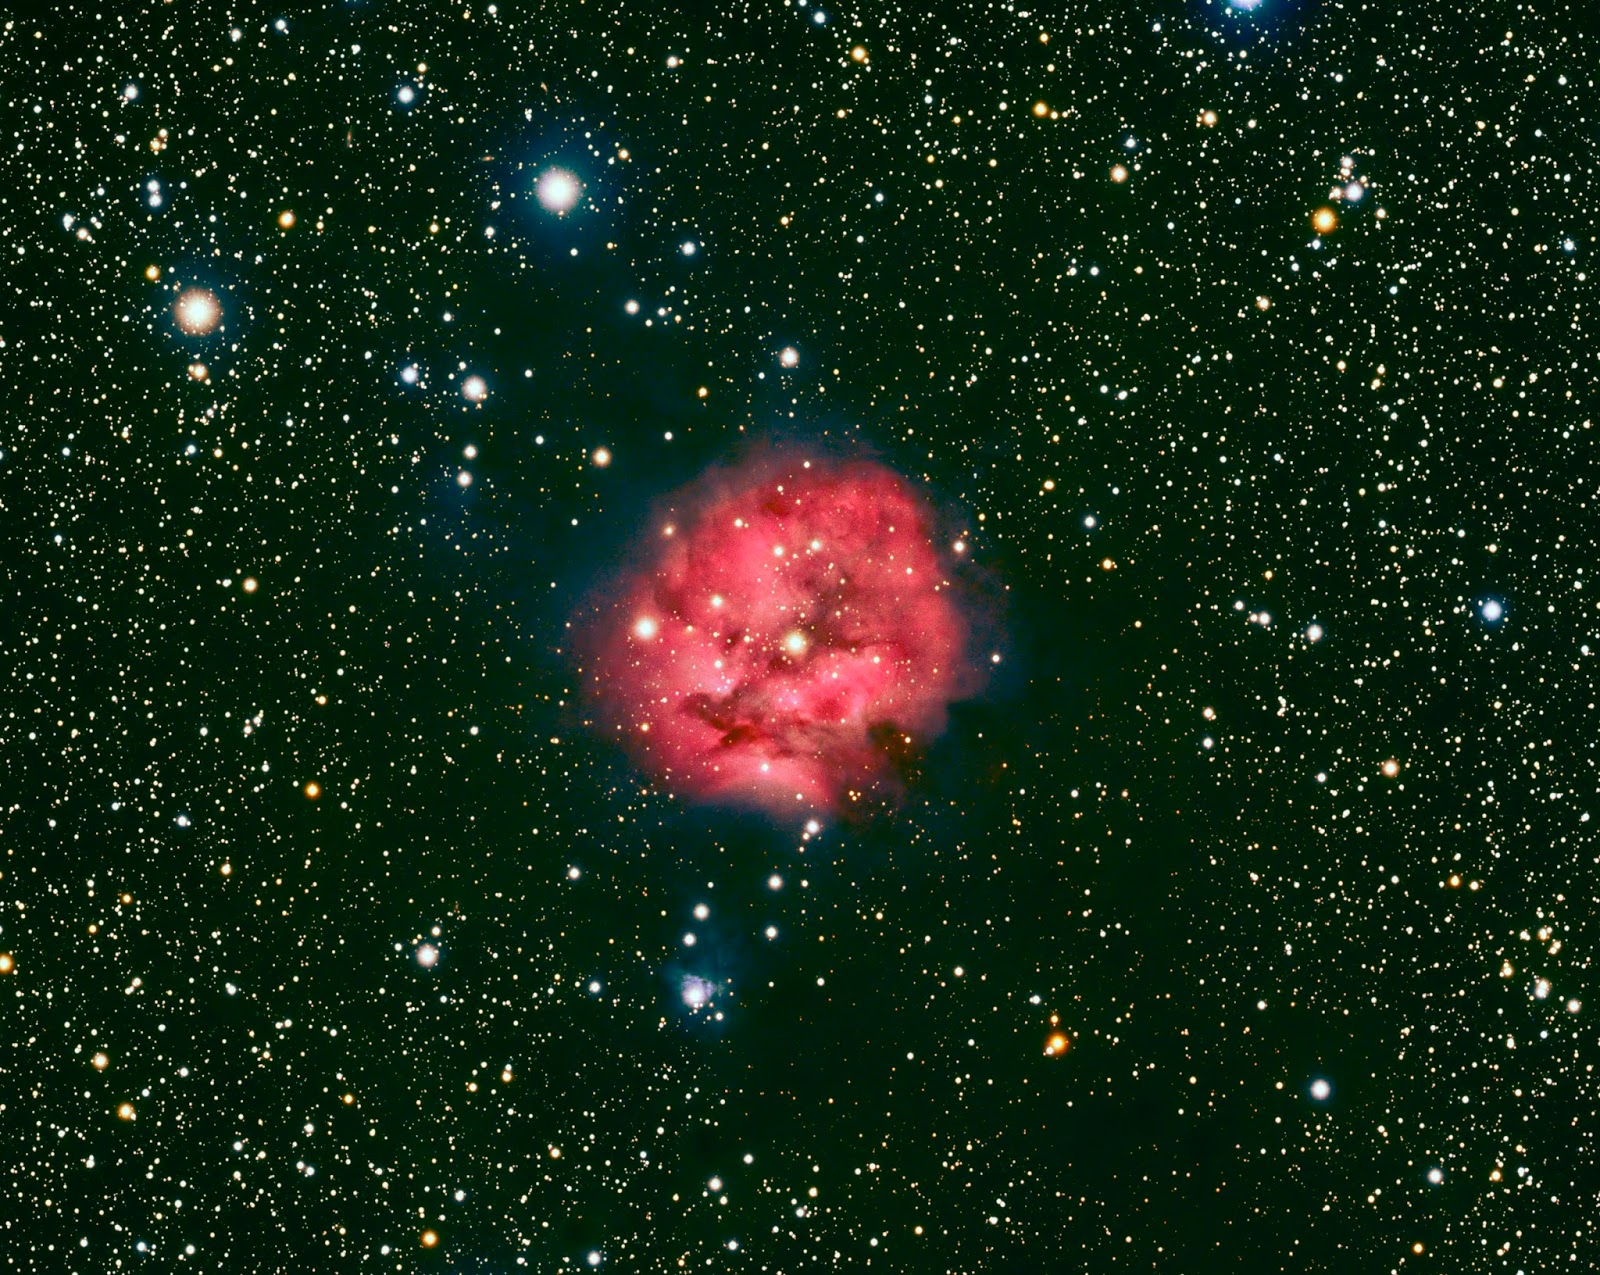
The Cocoon Nebula is an emission and reflection nebula in Cygnus. It is 4000 light years away and spans 15 light years across (it has a visible size of 12 arc minutes - the full moon is 31 arc minutes).
(click image for full resolution image)

The brightest (red) parts of the nebula is the emission part - the darker parts with the blue hue are illuminated by the central star with the unassuming name "BD +46°3474". It's a very young star (~100,000 years!), it is 5 times larger than the sun, has 15 times the mass of the sun and shines 20,000(!!) times brighter!!! The nebula is very young - many stars are still "pre-sequence" stars (i.e. they are not shining visibly yet).

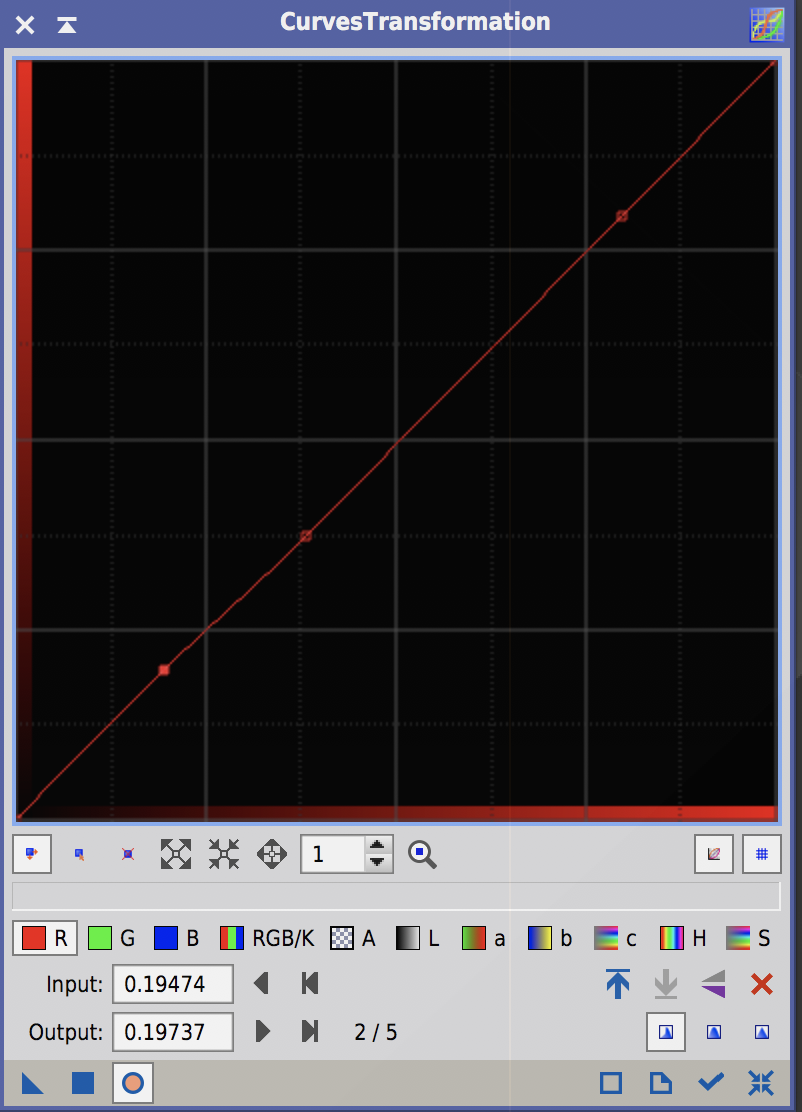
Processing this image was challenging because of the bright emission parts and the darker dust lanes around it. In my initial attempt, I focused too much on the bright, red part and its details and cut out almost all of the dust lanes:

I found it surprisingly difficult to process this image better. In order to do that, I tried out a couple of new things:

  1. Using the NBRGBCombination script in Pixinsight
  2. Carefully adjusting color levels using CurvesTransformation to bring out the red in the core and the blue in the faint regions
  3. Using a very fuzzy mask for processing the core that slowly increases protection over the faint, outer layers.

Using a (very) fuzzy mask to process nebula with faint outer areas

The image of the Cocoon nebula had a very bright core and a large area of fainter outer areas. When making adjustments (e.g. bringing out details in the core) I needed a mask that:
  1. Does not protect the bright core of the nebula
  2. Slowly faints out to the outer layers of the nebula
  3. Does protect the darker areas
I used the RangeSelection process for this.

The best way to do that was to first create a Preview over the nebula and the outer layers:

Then I open up RangeSelection and open the preview:


In order to get the transition between the core and the dark areas, I use a very high value for "Fuzziness" (I used 0.7). Now, when I move the "Lower Limit" slider to the right, I can see that the mask is very fuzzy:

The advantage of using a preview for this step is not only that I can zoom into the nebula, but also, that instead of creating a new image, the process overlays the resulting mask over the preview:

Now, I can toggle easily between image and mask (using the preview toggle button) to see exactly what parts of the nebula are strong protected and how it faints out. This first attempt was a little bit too large. I increase the "Lower Limit" a little and apply again:

Now, the brith parts are covered, but the mask isn't fuzzy enough (it doesn't cover the dark lanes enough). So, I increase Fuzinness - which decreases the cover of the inner parts. Upon which I decrease "Lower Limit" again to protect more. I play with these two settings until I have a combination that covers the bright parts and slowly degrades over the dust lanes:

Finally, I create the mask on the whole image and apply the mask:

Now, with this mask in place, I use LocalHistogramEquilization to bring out more details:

The process works very strong in the bright areas and then gradually fades towards the fainter regions!

Adjusting red and blue colors in an emission / reflection nebula

In my recent image of the Cocoon Nebula, I needed to adjust the red and blue colors very selectively:
  1. Keep the red in the core of the nebula (or maybe even increase it)
  2. Reduce the red in the fainter dust lanes
  3. Reduce the blue in the core of the nebula (to make it less pink and more red)
  4. Increase the blue in the fainter dust lanes
I use the CurvesTransformation process for this:

First, I want to increase the red in the inner parts and decrease the red in the outer parts. For that, I click in the inner parts, the dust lanes around it and the dark sky parts and notice where these points are in the diagram in the CurvesTransformation process:
Level in core part of the nebula
Level in dust lanes
Level in dark parts of the sky
Now, I set three points at these different levels:

This now allows me to adjust the levels in these three regions independently with smooth transitions in between:

I the same for the blue channel:

Only here, I decrease the level in the core (to make the core look less pink and more red), increase slightly in the fainter outer regions and decrease in the sky areas.

Now, the sky has a greenish hue (due to reducing the red in there). I also decrease the green in this area (but leave it in the other areas):

This now neutralizes the background without changing the color of the nebula or the faint dust areas.

Compare before and after:

Using the NBRGBCombination script in Pixinsight

In the past, I combined my narrowband data with LRGB images using a tutorial from LighVortexAstronomy. I tried the previous scripts in Pixinsight but they never really worked for me.

First, I use BackgroundNeutralization, ColorCalibration and SCNR on the RGB image to get the colors right. I also use DynamicBackgroundExtraction on the Ha and OIII images to clean up their background (I didn't do this on the RGB images as they are almost completely filled with stars and dust lanes).

This script has a fairly simple interface:

The first step is to select the RGB image and the narrowband images and press "Apply". The script opens a preview window where it shows the result of the combination:

One of the most useful feature are the two buttons RGB and NBRGB. They allow to flip from pure RGB to Narrowband+RGB picture and back. This makes it very easy to see the impact that the narrowband image(s) have.

See the difference between my RGB image and the combined image with default settings:

 
Pure RGB ImageCombined Image

The Ha data really brought out the red of the nebula. But unfortunately too much as the dust lanes are now also red. In order to reduce the impact, I increase the Scale setting for the Ha data. The default is 1.20, let's increase it to 3 (and click Apply again):

This is better, but the hue of the dark lanes are still very red. I tried various settings in the script, but could not increase the blue / decrease the red further without destroying the nebula). I decided to address this later with masks and CurvesTransformation.

One big caveat of this script:
IF YOU PRESS CANCEL WHILE IT'S RUNNING, PIXINSIGHT MIGHT COMPLETELY CRASH ON YOU (AND ALL UNSAVED PROGRESS IS LOST)!!! (Happened to me several times)

Saturday, September 15, 2018

M31 - The Great Andromeda Galaxy

This is the first of several images that I took at Lake San Antonio. Originally we wanted to go to Likely Place, but the wildfires destroyed the awesome dark skies up there :-( Lake San Antonio isn't super dark, but considering that it it just 2+ hours away from us it is pretty good.

(click on image for full resolution)

I n order to bring out the core, I used two different exposures: 600s/450sec and 60/45sec (for 1x1 and 2x2 binning). I used the tutorial from Light Vortex Astronomy - which was very good as always. In the end, it didn't make a huge difference. I probably should have rather taken only long exposures to get the faint details in the outer regions. In addition, I took Ha images after we returned home to bring out the nebulae.

I had to fiddle with the sequence of processing:

  1. Calibrate, align and stack the individual exposures (I ended up with 2 sets of LRGB images and one Ha image)
  2. Remove Gradients with DynamicBackgroundExtraction
  3. Combine the two different exposures with HRDComposition
  4. Combine the RGB images with LRGBCombination
  5. BackgroundNeutralization and ColorCalibration of the RGB images
  6. Folding in the Ha data
  7. BackgroundNeutralization again (the background was on the red side after folding in the Ha data)
  8. then processing as normal
Processing was surprisingly difficult. I assumed that processing images from the RH200 scope under dark skies would be easy. But the background gradients were surprisingly strong.

As many astrophotographers, M31 was one of the first images I ever took:

Amazing what difference 6 years of experience (and a lot of $$$ for better equipment) make :-)

Sunday, September 2, 2018

Imprecise slews after successful model building

At our recent trip to Lake San Antonio and afterwards I had a strange problem:

I polar align my RH200 scope. I build a model - RMS < 5.0.

But the slews are very imprecise.

SGPro can still center the object.

Afterwards, tracking is very precise.

...

I spent a lot of time trying to figure out what's happening. Some observations:

  • the slews are always the same, i.e. a star always ends up in the exact same place on my image (somewhere in the lower right corner)
  • building the model with more or less points has no impact
  • tried various parameters in the 10Micron handset (with / without refraction correction, set refraction parameters by hand, switch from J2000 to JNow in the ASCOM driver...) - always the same
I posted in the 10Micron forum, but nobody had a good idea.

Then, in the last nights I first thought that I figured something out. After model building I could slew with the handset to a start and it would be precisely in the center! But then I realized that TSX had still subframes on. When I turned them off, the slew were as before.

...

THAT was the clue! Normally, the slews should be precise with or without subframe as the subframe should be in the center of the image!!!

More analysis. Yes, ModelCreator creates a subframe in the lower right corner of the image (it uses width/2 for width AND left side and height/2 for height AND upper side!!!)

Once I used no subframes, everything worked again. Yei! Martin (he creator of ModelCreator) told me that he'll fix this in the next release of ModelCreator.

... but it cost me several hours of imaging time at Lake San Antonio when the Meridian Flip failed due to this issue ... :-(