Tuesday, April 15, 2014

Lunar Eclipse

The clouds made it impossible to do any "serious" imaging. So, I reverted to just a tripod, my Nikon D7000 and a lot of manual focus and exposure adjustment:

At the end of the core shadow.

First glimpse out of earth's core shadow.

With Mars (in the upper right corner).

Sunday, April 13, 2014

Laptop broken!

ARRRGGGHHHH! Last night, I wanted to continue to try out the 16070 chip. But then I noticed that my laptop was not consistently charging. It went on and off every few seconds. With the result that the laptop would discharge (slowly but still). Tried various things: different power supply, 12V power supply... But nothing. When the laptop is turned off, it completely recharges. So, it should still be possible to backup all the data (mostly images).

... now looking for a new laptop ...

I will use this opportunity to get a laptop with more memory and a newer, faster CPU.

Wednesday, April 2, 2014

NGC 2327 - The Parrot Nebula

This was a tricky object as it was very low and it passes behind our neighbors large tree. I could only image it for 2-3 hours per night.
(click on image for more detail)

This nebula is part of a larger region known as the Seagull Nebula. It's an HII region and emission nebula with an embedded star - HD 53367 - wich ionizes it. HD 53367 is a young 20 solar mass star with a 5 solar mass companion in a highly elliptical orbit.It's at a distance of 3750 lightyears from earth and has a diameter of ~100 lightyears.

This image consists of 2h 10 min Ha data and 6h 20 min OIII and SII data (overall almost 16 hours!) I would like to image this object again with a camera with a larger view. The Parrot Nebula itself contains very little OIII (blue) data. But you can see in the upper left corner, that the larger Seagull Nebula contains more.

This is the first image that I processed with Pixinsight.

Tuesday, April 1, 2014

Giving Pixinsight another try

My current workflow for (narrowband) images gets more and more convoluted. First CCDStack, then Photoshop - and then sometimes back to CCDStack. And in Photoshop I am using various plugins. Pixinsight on the other side (apparently) has everything that is needed to process images.

I found this tutorial how to process narrowband images with Pixinsight - it gives step-by-step instructions. I wanted to try it out on my recent images of the Parrot Nebula. I did the calibration, alignment, stacking in CCDStack.

First, here is what I get with Photoshop:

And here is my first try with Pixinsight (using the color combination from the tutorial):
There isn't a lot of color here (the Ha is so dominating) and I was clearly too ambitious and made the image WAY too bright and saturated.

So, I tried again using the standard Hubble Palette resulted in this image:


I like the colors of the Photoshop version better. But with Pixinsight, I could get WAY more detail and the sky looks much better too.

I asked on both the narrowbandimaging mailing list as well as the Pixinsight forum how to better color combine narrowband images. The two ideas that I received were to use CurvesTransform or HistogramTransformation.


I played with the CurvesTransform but found it very hard to manage. I could not find a way to boost the signal in one channel (red) and reduce another channel (green). But every change that I tried to make had broad heavy impact on the entire image and color scheme.

I had more luck with the HistrogramTransformation process. I could boost the red a little and reduce the green a little. Unfortunately, it had the side-effect that the background became too noisy. I tried to mitigate that by creating a mask by extracting the L component of this image and clipping the black point. With this mask, I could protect the background and apply the changes mostly to the nebula. This was the result:

Overall, I like the detail and the color in this image the most.

Saturday, March 29, 2014

Testing a new chip!

The guys at FLI tested my 11002 camera and could not fix it. The vertical stripes seemed to be inherent to the chip :-(

Although, I found ways to correct for the stripes, I'd prefer a camera that doesn't have any artifacts. After a little bit of research, I decided on the 16070 chip (also from Kodak). Greg at FLI was a little bit concerned that this chip would have similar artifacts (apparently both chips have a very similar architecture). But he offered to lend me a camera with that chip, so that I can try it out.

It arrived yesterday - and so did the rain :-( So, I started my evaluation just with flats. With the 11002 chip, I could see the vertical strips pretty clear at shorter exposures:

0.001 sec:


0.01 sec:


0.1 sec:


1 sec:


10 sec:


Well, so far so good. Now I have to wait for clear skies to take some real images.

Sunday, March 16, 2014

Using Robofocus Server instead of Ascom?

By chance I noticed an entry in the SGP focuser dropdown focuser box called "Robofocus Server". I read up on it and it turns out that this is an alternative way to drive the Robofocus focuser. Instead of creating and Ascom interface, this driver starts the Robofocus control program and uses that. One big advantage is that this driver supports reading the temperature sensor of the Robofocuser unit.
As I found out previously, the Robofocuser unit does not work with the Serial-USB adapters with the captive port. So, I used one of the cheap ones (which does not retain its port number) and it works beautifully: connects, controls and reads the temperature.
One weird thing is that the temperature is 100*Celsius...
For now, I will just use the Robofocus Server for focusing, but keep using the TEMPerHum device for temperature reading - then I won't have to recalibrate my temperetaure/focuser coefficient. If it works, then I should try to find a Serial-USB adapter with a captive port that works with the unit and ultimately might be able to get rid of one device.
Or is it better to have another device, but one program less running on my laptop?

Monday, March 3, 2014

Oscillating RA axis

In my last imaging sessions, the RA axis was heavily oscillating:

(the corrections aren't correctly plotted. They were in fact down, when the mount was too far up).

I moved the counterweight such that the scope becomes east-heavy. But that didn't change anything. I wonder if this means that I will have to remesh my RA gears. I posted on the ap-gto mailing list and got some good feedback:
  1. Several folks asked if this is this REALLY the RA axis and not the DEC axis? I'm almost 100% sure, but will check next time.
  2. It's unlikely that this is the result of backlash, i.e. remeshing the gears won't help.
  3. Check if oscillations only happen with then scope is targeted towards the zenith or also in other positions.
  4. Because the mount needs a couple of small corrections, it could be that some cable is getting stuck or such. The mount needs too many corrections to overcome this additional resistance - and then shoots over. Will check that - and also if they aren't getting stuck somewhere inside the mount.
  5. Bad callibration. One suggestion was to set aggressiveness to 0%, then 30%, then 60% then 100% ("Oscillations in RA are super rare and only occur if the loop gain is larger than 100% - caused by improper cal run.")
  6. Sanity checking my PHD2 calibration:You can also sanity check your calibration using the PHD2 log file.  Before a guiding sequence begins, there will be a block of text in the log that starts with "Guiding Begins"  Look below that line for values of xRate and yRate, which are RA and Dec rates respectively.  The numbers there are in units of pixels/millisecond.  Also in that text block, you should find a value of your image scale (arc-sec/pixel) assuming you have configured that in PHD2.  So taking the yRate * 1000 * image scale, you will get the Dec rate in units of arc-sec/sec - and you can compare this with sidereal rate, which is 15 arc-sec/sec for declination.  If you are guiding at 1x sidereal, your computed Dec rate should be pretty close to 15 in other words.  You can do the same for the RA rate, but you need to remember that the RA rate will be affected by the declination at which you do the calibration.  You would divide the xRate number by cos(declination) to get an equivalent value.
---

  • So, first thing I checked was if this was really the RA axis. I guided and pushed on the keypad the west and easy arrow. And sure enough what PHD designated as RA went sharp up / down.
  • Next, I checked all my cables. Couldn't find anything at first. But then I realized that I recently started to leave the RAPAS in the mount and that squeezed the USB and power cable that run through the mount. So, I removed the RAPAS and it went better. But after a while the oscillations were back.
  • Then I played with the calibration parameters. When I set Aggressiveness to 100 and Hysteresis to 0, then the mount was sort of able to compensate.
  • Finally, I checked how the mount tracks without any guiding:

  • Well, that does not look good. Somehow the mount itself creates these oscillations with an amplitude of 10+" and a frequency of ~7 minutes. And that is very hard to guide out.
  • I remeshed my gears - no change.
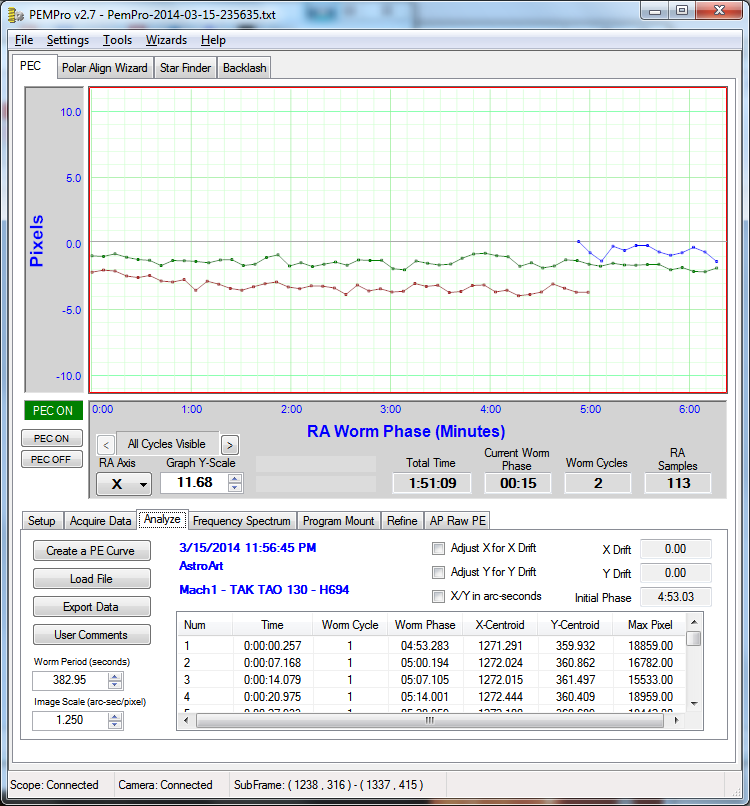
I took a PEM analysis:

You can see the larger error: 7.53" peak-to-peak. But at least it's periodic, so with PEC it should be possible to make it much smaller. I chose a quadratic curve and measured again:

1.15" peak-to-peak error only!

This should allow me to image the next nights. But it is concerning that this mount shows such a large periodic error.