Saturday, November 8, 2014

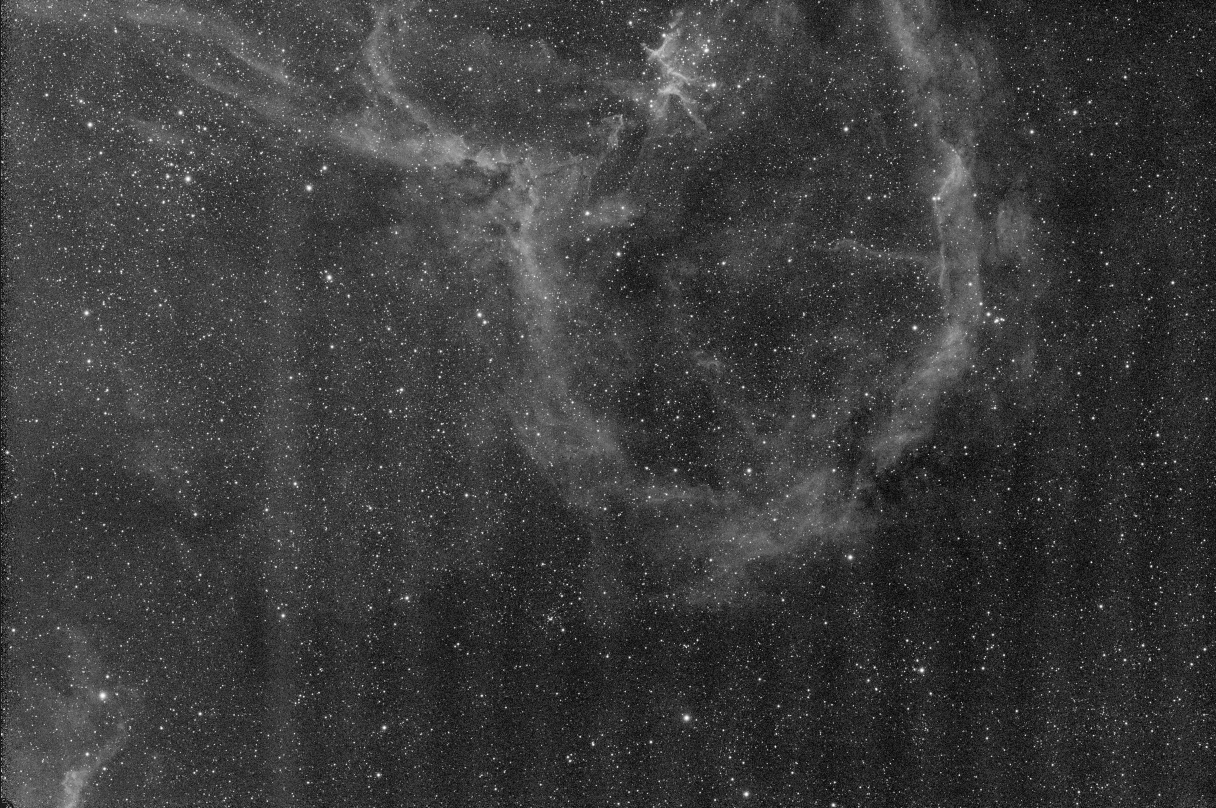
California Nebula

The California Nebula is an emission nebula in only 1500 light years distance (it's in the Orion arm of our milky way - the same arm that we are in).

(click on the image for a full resolution image)

This was my first mosaic - I did it with Pixinsight. Overall exposure of this image is 12.7 hours (3+ hours Ha, 5 hours OIII, 4.5 hours SII).

Unfortunately, I am still fighting with vertical and also horizontals stripes in my images. You can see it in the lower right corner. But apart from that, I quite like it.

Tuesday, November 4, 2014

First Mosaic

I wanted to capture the California Nebula which is huge! So, I tried for the first time a mosaic. SGPro's framing wizard makes capturing super easy.


You just draw a rectangle over the whole area that you want to capture and SGPro fills it in with overlapping images. The most important part is to have the rotation of the camera exact - otherwise the images will end up crooked. Creating a sequence of this mosaic creates two targets - one for each subframe.

I captured the images over several nights. Unfortunately, the vertical stripes were still in some of the images - I would try to get rid of them in post processing.

For processing, I first calibrated, stacked ... all images the same way in CCDStack.

For further processing, I found this tutorial how to do this with Pixinsight. I started to follow this.

First: cropping - nothing special here.

Resulting Ha images:


Next, we have to merge the images. First, using staralignment (Register/Union Mosaic). Strangely enough, Pixinsight could only find 30-40 stars in each image - which wasn't enough to overlap them. I had to play with various parameters in the "Star Detection" tab. Decreasing the "Log(sensitivity)" parameter detected more stars (40-50) but still not enough to match the two images. Increasing "Peak response" to 1 (maximum) lead to more the 100 stars being detected - which gave almost 20 stars in the intersection. Enough to overlap the two images:

The little black bars on the outside are because of cropping the individual images (and because the rotation wasn't 100% set correctly). But if we look closely at the intersection we can see the seam from the two images - this will be tough to remove. That's why Pixinsight has another process to smoothly stitch mosaics: GradientMergeMosaic. It's a little tricky to apply (see tutorial) as it requires a few temporary files to be created. But after doing all that, I could finally apply it and got this:

There is clearly something wrong at the seams. After closely inspecting and trying out a few things, I realized that this is a result of the different background levels of the two images. So, we need to remove the background gradients of the individual images first (DBE). Doing that* and then using GradientMergeMosaic results in this:

Even under close inspection, there are no seams left: 

From here on it's normal processing. Including removing gradients (once more) in the combined images. The reason is that the two images still had slightly different background levels and combining them resulted in a (smooth!!) gradient.

*Also, by removing the background gradients first, I could use the default star detection parameters in StarAlignment!

Saturday, October 18, 2014

Milky Way from Hawaii

I brought the Vixen Polarie to our recent trip to Hawaii. One night, I found a dark piece of beach (not easy!!!) and took wide field images of the milky way:


It was surprisingly difficult to get this shot. Although, the beach felt very dark, this is a 90 sec exposure:

Stacking 10 of them, lead to this:

I had to do some stretching, curve adjustment, saturation adjustment and finally rotate the stacked image, so that the horizon is straight and copy/paste the horizon from a shorter exposure into it.

... and I need to do a better job focusing my camera ...

Sunday, October 12, 2014

Imaging the moon - stacking multiple exposures

After I took a lot of images of this weeks lunar eclipse, I tried to stack some of them. I still had Registax6 installed - but never really used it. So, this time I tried to use it. But every time it came to stacking the images I got a "Out of memory" error. I found a couple of references on the web and people recommended to lower the number of alignment points. I chose 20, 10, 5 - even 3. Always with the same result.

I followed the instructions and have to say that everything went very smoothly. Instead of repeating the process (it's really well described) here are just the individual stages:

1. Raw JPEG:

2. After stacking with PiPP/Autostakkert2:
(interestingly, the image looks almost worse now!)

3. Deconvolution with AstraImage
(the details are back!)

4. Level adjustment with Photoshop:

And this is the full image:

Maybe I should do these more often...

* I was looking for instructions to do the sharpening in Pixinsight. But the only tutorial is pretty old and not on the web site anymore - you can only find it through webarchive (without most of the images :-(

Lunar Eclipse October/2014

This time, I took images with my Nikon camera through the Telescope to get a better resolution. Here are the highlights of the night:

A composite of the different phases over our trees.

A stacked and improved image during (almost) maximum.

And a video of the entire eclipse:

A couple of lessons learned:

  • I have to figure out how to track the moon better. I though that the Mach1 mount would track the moon when I center it on the moon, but it was still tracking the stars. Had to do a lot of recentering - which resulted in these jumps.
  • At the absolute maximum, ControlMyNikon failed! I had to restart the laptop to reconnect it and shoot. I should try to use DSLR Stacker (which I could if tracking would be better)
  • I was surprised how much darker the moon is during the eclipse. Before the eclipse, I had to shoot with ISO100 and 1/100 sec exposure time. At the maximum of the eclipse, I went to ISO2500 and 1 sec exposure time!!! You can see how much I was off sometimes in the video.
Processing these images was SOOOOO different from regular deep space object processing.

Sunday, October 5, 2014

Vertical Stripes - again

I started imaging IC59 (the Cassiopeia Ghost) and the Heart Nebula. And when I calibrated and stacked my SII subs, this is what I got:

Vertical Stripes again!!!

I wanted to analyze them better, so I
  • calibrated the subs
  • did not align them
  • normalized them, but highlighted an area without any nebulosity or stars
  • used a very low value (1.5) for the STD sigma rejection

Now we can see the stripes really well. The weird thing is that a) the stripes don't go all the way to the left side, and b) they are ~150 pixel wide. But the KAI-16070 chip has a spacing of 40 pixels. So, it can't be the same reason that I saw with the 11002 chip.

I went ahead and checked the other image that I just took (IC59):
Here the stripes are even more prevelant. 

I then went ahead and checked 2 previous images that I took:
Tulip Nebula
Pelican Nebula
They are easily noticeable in all images. And it's always the exact same pattern. I guess the only reason why I didn't notice them was that they were very bright with only very little "empty" background.

I checked with Richard, Tim and Jim. We went through the usual list (bias frames, darks, flats...) But nothing seemed suspicious (I can't see them at all in the bias or dark frames!) Finally, Jim asked me in which mode I took them - in fast download mode. He thinks that that's the problem - he never recommends to use fast download for images - maybe for plate solving or focusing.

So, here are my results from the heart nebula:
With fast download


Without fast download

Richard thought that I might have (ambient) temperature dependent bias drift.

When looking at my bias:

It shows pretty much the exact same stripes as I see in my images (including the gap on the left hand side).

Richard suspected a temperature (ambient) dependent bias drift. I took bias frames in the house, the fridge and the freezer to check this:

HouseFridgeFreezer
  Maximum: 985 ADU
  Background: 959 ADU
  Maximum: 998 ADU
  Background: 976 ADU
  Maximum: 985 ADU
  Background: 959 ADU

The difference is always 26 ADU, but with lower ambient temperature, the signal goes down. And as easily visible, the stripes get more pronounced with lower temperatures. Richard recommended to create bias-free dark frames, i.e. take dark frames and then bias frames at the exact same temperature and subtract the bias from the dark. And then take bias frames at the same ambient temperature as the light frames and use those together with the bias-free dark frames.

Here is the stacked dark master:


And here the bias-free dark master:


If you look closer, you can see that the bias-free dark master has no vertical stripes or such.

So, I took bias frames at the same temperature as my lights (18C). And then I processed the IC59 SII subs again with the bias-free dark and the bias master at 18C. The result:

Bias at same temperature as lights (the lights were taken at 17-25 degrees, I used a bias master that was taken at 20 degrees):
And here with the bias frames at a different temperature:

I then calibrated all lights with corresponding bias frames (i.e. lights that were taken at 17C with bias that were taken at 17C and so on), this is there result:

The stripes are way less in these images, but are still there...

One final reason could be that the flats and lights are fast download and bias and darks are slow download. I'll try to take all as slow download and see how it works.

OK, I think I finally nailed it. Took flats and lights at 4MHz last night. Here is the unaligned stack:

And here is the properly aligned image:

No stripes - only annoying gradients. But I know how to deal with them...

So, only slow (4MHz) downloads and calibrate with bias at the same ambient temperature. It took me a little to find out how to set 4MHz as the default download speed in TheSkyX - turns out I have to create an equipment profile and then this setting is stored (and to get access to equipment profiles I had to update TheSkyX to the latest version).

For easier processing, I wrote myself a quick python script that adds the ambient temperature to the filename:

import os
import glob
import pyfits

for i in glob.glob('*.fit'):
  if os.path.splitext(i)[0][-1] <> 'C':
    fit_file = pyfits.open(i)
    new_name = os.path.splitext(i)[0] + ' ' + str(fit_file[0].header["FOCTEMP"]) + 'C' + os.path.splitext(i)[1]
    os.rename(i, new_name)
    print i + " renamed to " + new_name

... and now back to imaging - hurra!

Friday, October 3, 2014

Using my Nikon D7000 (again)

I decided to use my Nikon D7000 for astro imaging again:
  1. For images where I don't need to use long exposures, e.g. the moon (in preparation for the lunar eclipse in October!)
  2. To mount the Nikon on top of the scope to take wide angle images while imaging with my CCD cameras.
First, I had to dig out my Shoestring DSUBS adapter (long time ago that I used that). I could mount it well on my dovetail on top of the scope. Then I had to figure out (again) how to connect it. First I tried with DSLR Shutter (that's what I used MANY months ago, i.e. it should work). I could connect, but it didn't trigger the shutter. Found this post on the shoestring forum that explains it:
  1. Plug in the box to the computer, then the other cable from the box to your camera.
  2. Set DSLR Shutter to use the DSUSB if it doesn't automatically find it, then under the file menu select "AF during exposure (Nikon D200)", trust me on this one.
  3. If you want to use the mirror lockup feature (why wouldn't you?) make sure that is checked on the main DSLR Shutter screen.
  4. Set your D7000 for M mode (top left dial), then Mup mode (dial just below the top left dial), then rotate the top rear thumb dial until you see BULB, lastly make sure you move the focus selector to M (left front of the camera near the bottom).
With that it worked - including the mirror lockup feature. Yei! But then I realized that I can't do subsecond exposures with DSLR Shutter. So, it would work for long term exposures but not for the moon :-(

For imaging simultaneously with the Nikon and a CCD camera, I ordered a Camera mount from ADM. I will put it also on top of the Losmandy dovetail - right over mount, so that the additional weight does not impact guiding accuracy.


For imaging through the scope, I needed a new adapter from preciseparts to go from the 92mm Takahashi thread to a t-thread. Luckily I noticed just before ordering it, that the Nikon camera is not flat and that the 92mm size barrel would not fit if it's too snug. So, I dug out some of my t extensions and ordered a slightly shorter adapter. With that, the camera fit perfectly.

Then I tried to connect to it from SGPro. First attempts didn't work. At some point, I read the error message which said that I should remove the SD card ... and with that, I could connect. Tried to take an image: SGPro triggered the exposure correctly. But then hung when it tried to download the image. I tried various things (all image settings, <30 second exposures with native exposure and >30 sec exposures with bulb) - always the same result. Asked for help on the SGPro forum.

Next, I checked if I could use TheSkyX - but it can only connect to Canon DSLR cameras.

Finally, I dug out Nikon Camera Control Pro. But it only showed a "No camera was detected" error message when I tried to connect. Looked around and found tons of complaints. But nobody seemed to have a good solution...

One post pointed to ControlMyNikon - tried that one. After some trial and testing, I got it to work! Including Live View!!!