Monday, August 17, 2015

Stars over Ghost Ranch

The night at Ghost Ranch was awesome. Although the rock formations were completely black (I had hoped that they would be just a little bit light up) it made for some amazing pictures:

First, the milky way over Ghost Ranch:

The lights in the lower right corner are from the cities Santa Fe and .

Then, a time lapse of the milky way with some Perseid meteors in it. I used the Vixen Polarie differently this time: I mounted it completely horizontally and set it to 1/2 speed. With this I got an effect that the foreground is also slowly moving:

And finally, the composite of all meteor images (see previous entry how I created it):
(click to see a full resolution image)

Sunday, August 16, 2015

Perseids - my first meteor composite

This year, the peak of the Perseids coincided with a new moon. AND we were on vacation in Santa Fe. Great opportunity to get some images and try my first meteor shower.

I drove 1.5 hours north of Santa Fe to Ghost Ranch.

I started setting up my camera at 8pm. Once it was dark, I took a couple of images for a mosaic of the milky way. Checked focus...

Acquisition

I then setup the camera on top of the tripod and took continuously ISO 6400, 19 sec exposures. I ended up with some 650+ images - and ~50 with meteor trails.

Alignment

First I had to figure out how to align all images with meteor trails. I selected one that was in the middle of the sequence as the background.

My first attempt was to align all images with the StarAlignment process in Pixinsight. Only very few images could be aligned. As soon as the image was too far away (~20 minutes) from the background image it failed. The reason seems to be that a) there wasn't much overlap, but b) the 14mm focal length creates a lot of distortion in the corners.

Next, I tried "2-DSurface Splines" as the Registration Model in StarAlignment. It's suitable for much larger distortions in images. With this I could align 23 of the images.

Next, I created 1000x1000 subframes of meteor trails that couldn't be aligned. With that, I could align another 15 images.

But several of the remaining images contained meteor trails that we still inside the background frame - they were just too much distorted. For those frames, I used the DynamicAlign process in Pixinsight. It took me a while to figure out how it works:

These two images have some overlap and the meteor trail of the second image is clearly in the first one:

After opening the DynamicAlignment process, you have to select the primary (background) and the secondary image (meteor trail):

Now, DynamicAlignment works by mapping stars from one image to the other. First, I select the bright star at the tip of the meteor in the first (background!) image:

Pixinsight has no knowledge yet of any distortion, relation... between the two images, so it puts this point in the second image just near the X/Y coordinate of the first image:

I drag this indicator with the mouse up to the correct star in the secondary image:

Now, I can enlarge the second image to position the star correctly:

And now I zoom the first image to a similar scale and position in the image:

Now, I click on bright stars next to the first one. Every time, Pixinsight highlights the star in the second image that it thinks maps. As soon as it gets it wrong, I correct it in the second image. After a few stars, Pixinsight gets an idea of the distortion between the two images and gets almost every star right. I orient myself on the second image and click many stars around the meteor trail:

Once I think I have enough stars, I click the green "Execute" check mark and create a registered image:

It's easy to check the alignment (just putting the registered image on top of the background image and switching between the two). You get star alignment pretty quickly (30+ alignment stars). But when you look at the registered image, you can see that the meteor trail is not straight anymore!! Pixinsight calculated a transformation based on the clicked stars that resulted in this. This can be fixed by clicking on more stars near the area where the meteor trail is curved.

With this, I could align 6 more meteor trail images!

This brings the overall number of meteor trails to 44!

Merging all images

Similar to my star trail image, I want to merge all the images using Layers in Photoshop and Lighten blending mode.
... and immediately run into the first issue:

Many of the full frame images have the tree and mountains in them! Well, with a little bit of effort, I crop them out. Unfortunately, you can't easily crop a layer-only (crop is only for the full image), so I ended up just cutting out the non-sky areas of an image:

Which results in this image:

Still no luck - a lot of the images overlap with the ground and the sky background isn't even across all the images. So, I'm using the lasso to cut out smaller areas around the meteor trails:

Better, but the different background levels still make it bad. I tried a little bit to lower the backgrounds around the meteor trails, but especially the fainter trails would get even fainter. So, I ended up cutting out all the meteor trails with the magic wand (using high tolerance in areas where the meteor trails is very bright, and much lower (down to 2) in areas where it is very faint):
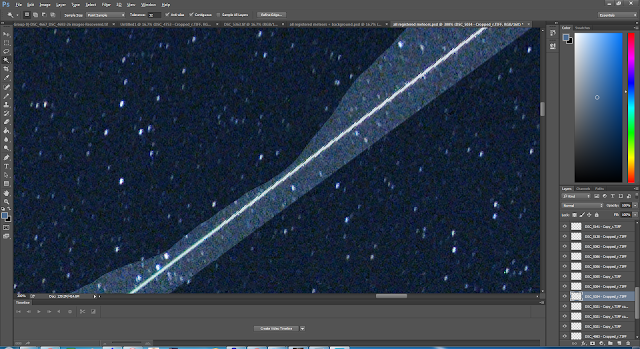

Doing this carefully for all meteor trails, I finally get this merged image:

Final Processing

I find processing in Lightroom easier then in Photoshop. It has all the features that I need but is much simpler.

Start:

First, I adjust the temperature to have less blue:

Then I use Dehazing to get more detail:

Dehazing seems to shift the white balance into the blue again, so I correct it again:

Next, I remove the vignetting in the corners:

Clarity to increase detail:

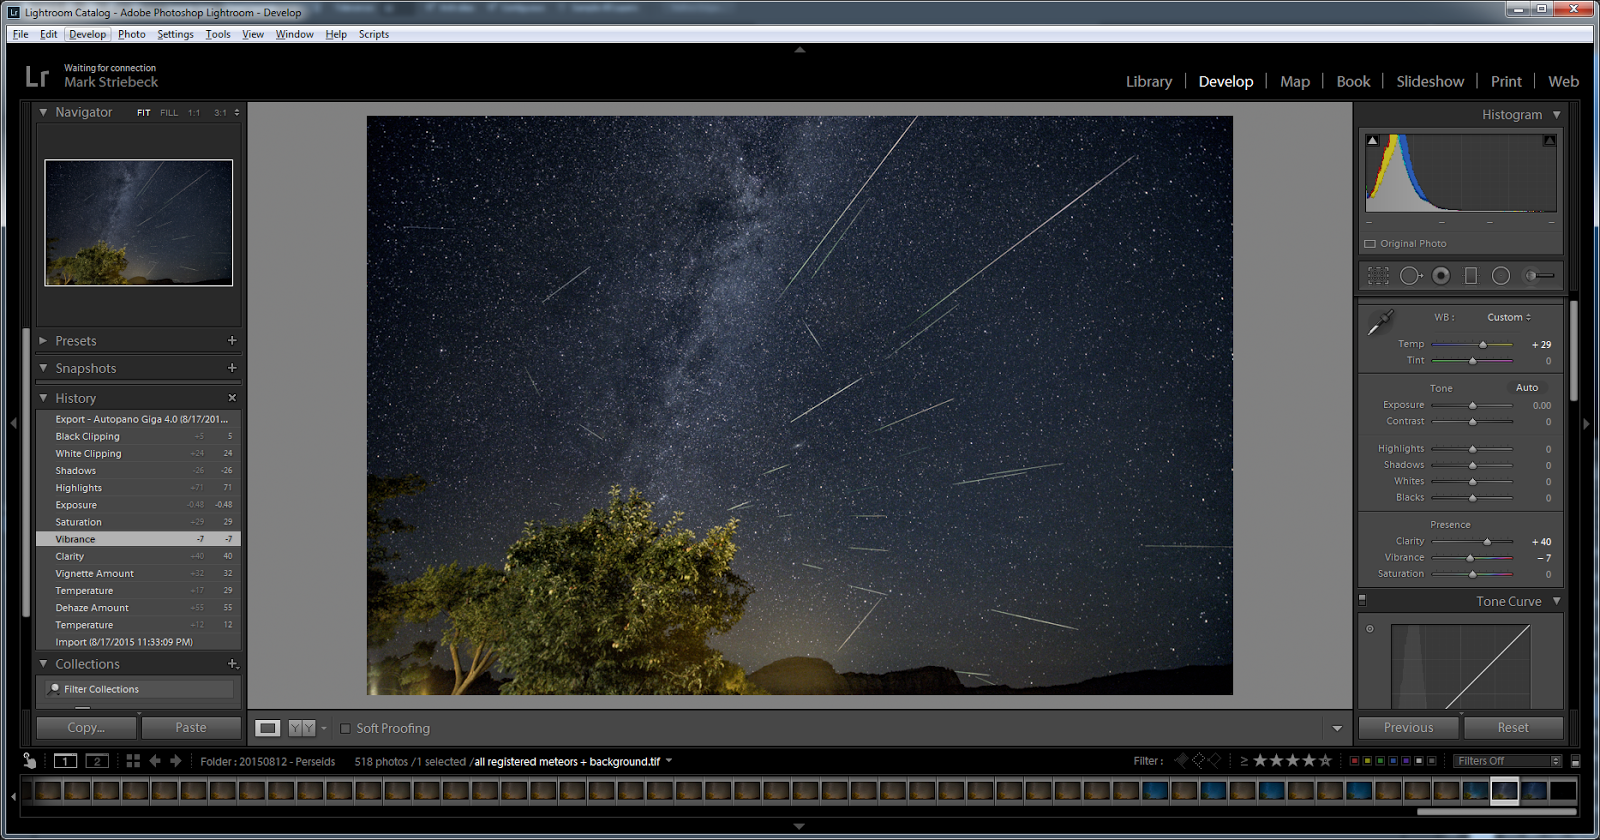
Turn down vibrance a little to give it a more natural look:

Increase Saturation slightly to bring out the colors:

Lower the Exposure just a little to darken the image:

Increase Highlights to bring out the stars, meteor trails and milky way:

Decrease shadows to darken the background and sky:

Finally, white clipping

... and black clipping to bring out more details:

Done!

This is the final result:
(click on image to get a higher resolution view)

Not too bad for a first one ...

Wednesday, July 29, 2015

DEC axis unresponsive!!!

My nice, new MyT mount suddenly stopped slewing. First, I had a couple of "mount can't slew" warnings. I thought that I exceeded limits. But then the DEC axis completely stopped working. Rebooted the mount. Restarted TSX. Rebooted computer... Nothing

I posted on bisque forum, but didn't get any good replies.

Checked all cables and connections ... Nothing.

Finally, contacted a friend who got me in touch with Daniel Bisque. We finally figured out that the DEC axis can't even initialize (the DEC led doesn't stop blinking at startup). Checked the driver, the cables again ... Nothing.

Tried everything with clutches off to make sure that nothing is stuck ... Nothing.

So, we decided to exchange the MTS 5000 board. Sent mine in...

August 30
... got a new one back. Installed ... Nothing.

Tried to read the DEC index - didn't work either.

The next guess was that it might be the cable itself.

Sep 14
Received a new cable. Installed ... Nothing.

Tried everything again (initializing, reading DEC index ...) ... Nothing

Oct 2
Next guess was that it was the motor / worm block. I received a new one.

Connected it (without installing it in the mount) to the board. Started. SUCCESS!!! Both RA and DEC initialized.

Next, I installed the new worm assembly and connected it. Still works.

Next, adjusted the Cam Stop - couldn't find exact value for MyT. Screwed the screw in until it hit the plate and then backed it off a little. Could still easily move the mount when disengaging the worm gear.

Next, set the Motor Index Angles.

Next, wanted to "excercise the mount" - did not work. Mount doesn't move and the RA and DEC lights blink and beep.

Maybe the mount needs to be better balanced. Attached the counterweight shaft - still the same result.

Tried to home the mount first - same result.

Tried to slew the mount with the handset - same result.

Next, I mounted the scope and the counterweights to get really good balance - same result.

Well, closer but no cigar. Mailed Bisque again ...

Wednesday, July 22, 2015

CCDAutopilot only takes subframes ! (for initial test frames - dooohhh!!!)


When I tried to take flats with CCDAutopilot at GSSP, it suddenly only took small subframes!!!

I restarted CCDAP, TSX, rebooted the computer, plugged the camera out and in ... nothing. It kept switching subframes on when it took flats. I ended up borrowing John's flat panel and used that for flats.

At home, I investigated more but couldn't figure out what was wrong. There was nothing suspicious in the log file. I also couldn't find any setting in CCDAP. I posted about this on the CCDWare forum. And John Smith (as usual) asked for a log file. That evening, I tried it again to get a log file, but was then distracted and kept CCDAP running.

... and suddenly realized that the flats that CCDAP took were full frame!!!

After more investigation, it turns out that CCDAP started to take the test frames (to check if the right brightness level is reached) as subframes and then takes that real flats as full frames. Probably to make the initial test frames faster to download. I'm sure that was in some release notes ...

Sunday, July 5, 2015

Paramount MyT - Day 10 - Further tweaks to PHD2, SGPro and the MyT driver & Rotating base plate!!!

Carried my scope out after our vacation. I set the scope in roughly the same place where I had it before our vacation, but could immediately see that the polar alignment would be completely off in Azimuth. Apparently, what happened when I carried the scope outside, I rotated the base plate (I noticed this earlier that it's not completely sticky). I asked on the Software Bisque forum about that.

Next, I needed to calibrate my model and redo my polar alignment. I connected the scope, homed it and then slewed it to Arcturus. I put the red dot finder on the scope, turned the base plate until Arcturus was close to center. Then I ran a model with 37 points. did an accurate polar alignment, ran another model and had my PA at 19.1 arcsec Azimuth and -67.3 arcsec Altitude. Pretty good.

As GSSP is in 10 days(!!) I decided to use the MyT mount without relying on T-Point slewing and tracking accuracy. I.e. I unchecked the "Inhibit Sync to protect TPoint model" setting in SGPro. This would allow SGPro to do proper center commands. Before doing that, I exported my current model to make sure that I still have it (not sure if adding syncs from SGPro would have any effect on the stored model).

I then calibrated PHD2 and wanted to do some manual tests. Noticed for the first time that PHD2 does not seem to notice when the MyT mount slews (I verified that the "Stop guiding when mount slews" setting is checked). So, I have to remember to manually stop it if I want to slew the mount.

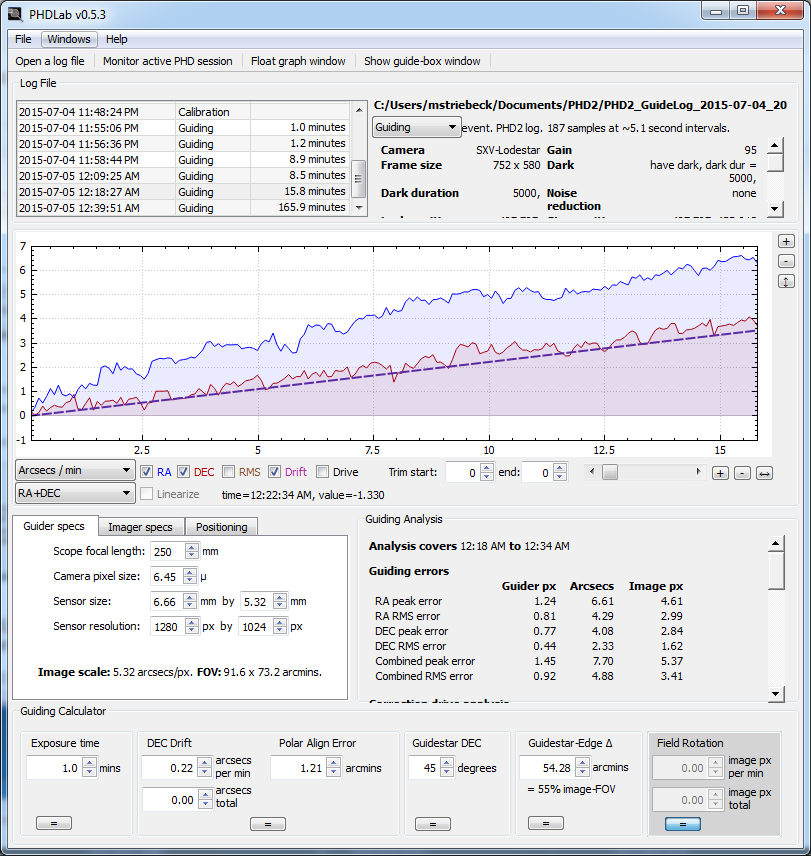
First, I wanted to see how the mount is tracking without guiding:

The measured PA error of 1.21arcmin is consistent with the one from TPoint (19.1 arcsec Azimuth and -67.3 arcsec Altitude = 1.16arcmin). Good at least I don't have these inconsistencies between TPoint and PHD2 anymore. It's hard to see what the tracking accuracy is with the slope, but it seems to be below 1 arcsec...

Then the next surprise: suddenly, PHD2 corrected the DEC axis wrongly... Turns out, I need the "Reverse DEC output after meridian flip setting" in PHD2. With that, everything worked.

By now it was late again and I wanted to see how guiding would work. I setup a sequence on SGPro to image the core of NGC 7822. Here is the PHD2 guiding output:

There are the usual dithering spikes. In between, both RA and DEC are mostly below 1 arcsec - which is typical for seeing in our backyard. And the guide box shows that corrections were applied at >0.6 arcsec but maybe not aggressive enough and/or often enough. Need to work on calibrating PHD2 now.

Sunday, June 28, 2015

Sunset Time Lapse

I think this is my first really good sunset time lapse:

Capturing

I used qdslrdashboard for controlling the camera. Unfortunately, it stopped working after 20 minutes or so - but at least it didn't disconnect like I experienced earlier. I wondered if it has to do with Androids scheduling mechanism and that it can't run well as a background app when the screen is dark. I chose the "keep screen on" option in qdslrdashboard and that seemed to fix it - of course that also means that the battery drains so much faster.

The whole capturing setup now consists of
  • the camera itself
  • the intervallometer (I take a photo every 30 seconds)
  • an Android phone or tablet running qdslrdashboard (connected to the camera either via USB or wifi)
  • a usb recharger for the Android device (which means I have to connect via wi-fi)
... oh, and the handwarmers strapped to the 14-24mm lens to avoid dew on the lens.

Once setup, it works very well and doesn't require any fiddling or such.

One issue that I encountered a couple of times was that qdslrdashboard stopped adjusting or completely disconnected from the camera (in either USB or wifi mode). I asked on the qdslrdashboard forum and the only idea was to use the "keep screen on" setting. Which works, but then the tablet/phone discharges really quickly. So, I have to use a USB recharger (and connect to the camera via wifi).

Processing

The latest version of LRTimeLapse made processing even easier. Now, you only do one pass (and not two as previously) between LRTimeLapse and Lightroom. I found that the key piece is the selection of the key frames:
  1. Need to make sure that I have key frames at all the "significant" moments. E.g. when the sky goes red, making sure that one key frame is in the middle of it to shift the white balance slightly to bring out the red more. LRTimelapse only allows to create n key frames at equidistant times in the video. I.e. often I have to choose to many to make sure that I have one that's at the right moment.
  2. At those key frames, I do careful manipulation of the images to create the transitions that I wanted. E.g. for this timelapse, these were my keyframes:

And this is how I edited them:

You can see that I changed them in a way that creates a consistent flow from bright to darker and preserve the color (in particular the blue sky).

LRTimelapse then takes these keyframes and interpolates all the images in between such that it creates a smooth transition. It also smoothes out the step function that was created when taking the images (qdsrldashboard always takes 3 images with the same exposure time and ISO and only then adjusts them if they are darker then the reference point).


In the photo overlay, you can see the different progressions:

  • dark blue: the original images (you can see the tooth saw curve, when qdslrdashboard adjusted the exposure time/ISO and you can also see that twice qdslrdashboard stopped adjusting (see above the disconnect issue)
  • yellow: the corrections
  • light blue: the resulting smooth progression from bright to dark.

Friday, June 26, 2015

First Milky Way Panorama

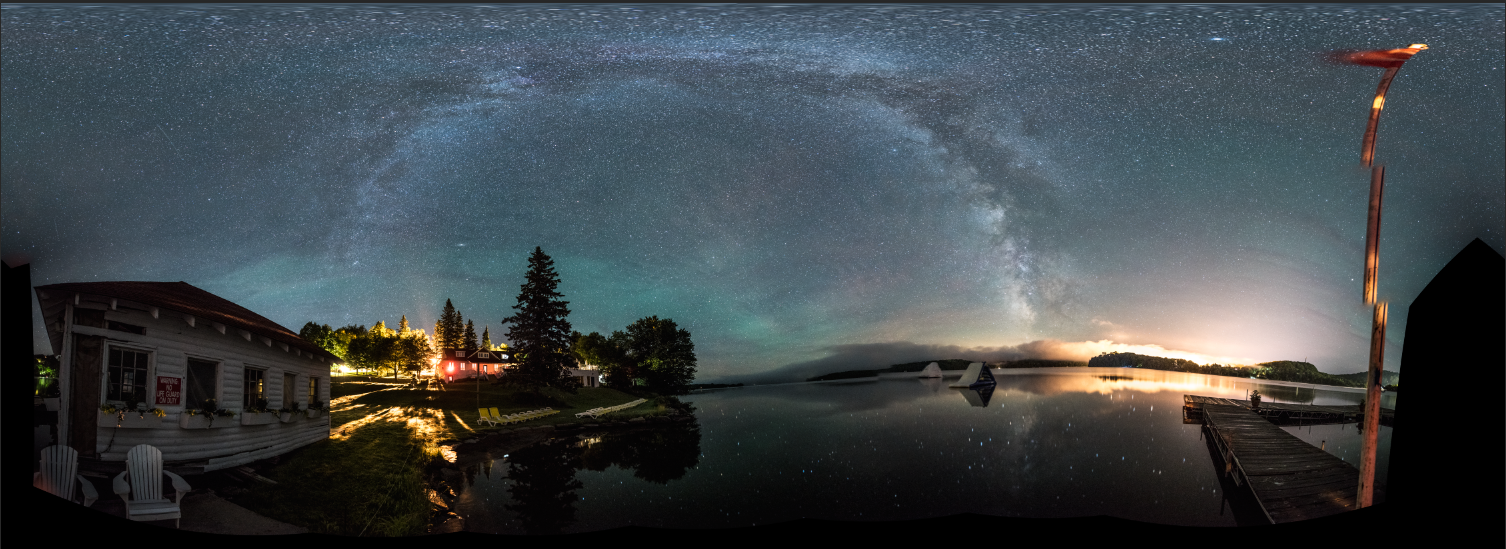
Our vacation in Canada gave me the opportunity to try out my first milky way panorama:
(click image for full resolution)

There are still some issues with it, but for a first try, I'm pretty happy. I used the great instructions from Mike Salway.

Capturing

Capturing the images turned out to be surprisingly easy. First, I needed to focus. I used a bright star (Atair in the Eagle) and used LiveView with maximum zoom. I played quite a while with it to make sure that I have the smallest possible star.
Next, I needed to make sure that no dew forms on the lens. The 14-24mm lens is sticking quite far out. I used some handwarmers that I fixed with one of Beth' hairbands :-)


Then I oriented the camera such that it captures some of the lake and the sky. Took one image. I needed to make sure that the images overlap sufficiently. With the Manfretto head, this wasn't a problem at all:

I just turned the horizontal knob and checked how much overlap I have. Turns out, I needed 10 turns for ~30% overlap. So, I did this all the way round. Then I moved the camera higher - making sure that there is overlap with the first layer. Now, I needed 15 turns for 30% overlap. Finally I move the camera almost all the way up and too 4 images from the zenith. These are the resulting images:

Processing

First, I loaded all images into Lightroom and made some basic adjustments (White Balance, Exposure...) I did it on one image and applied the same modifications to all other images: First in Develop Mode: Develop Settings -> Copy Settings) and then in Library mode Develop Settings -> Paste Settings.

Before:

After:

This is how all images looked afterwards:


Next, I need to merge all the images together. First, I wanted to try out if Photoshop's Photomerge can combine these images...

Well, that's rather tragic. Next, I tried Autopano (Giga):

Much better (I only need to adjust the horizon a little - although it's still not perfect).

Now in Photoshop, I first try to straighten the horizon and create a better arc of the milky way:

Next, I crop out the sides:

I fill in the corners with the clone/stamp tool and also erase the warped flag pole on the right:

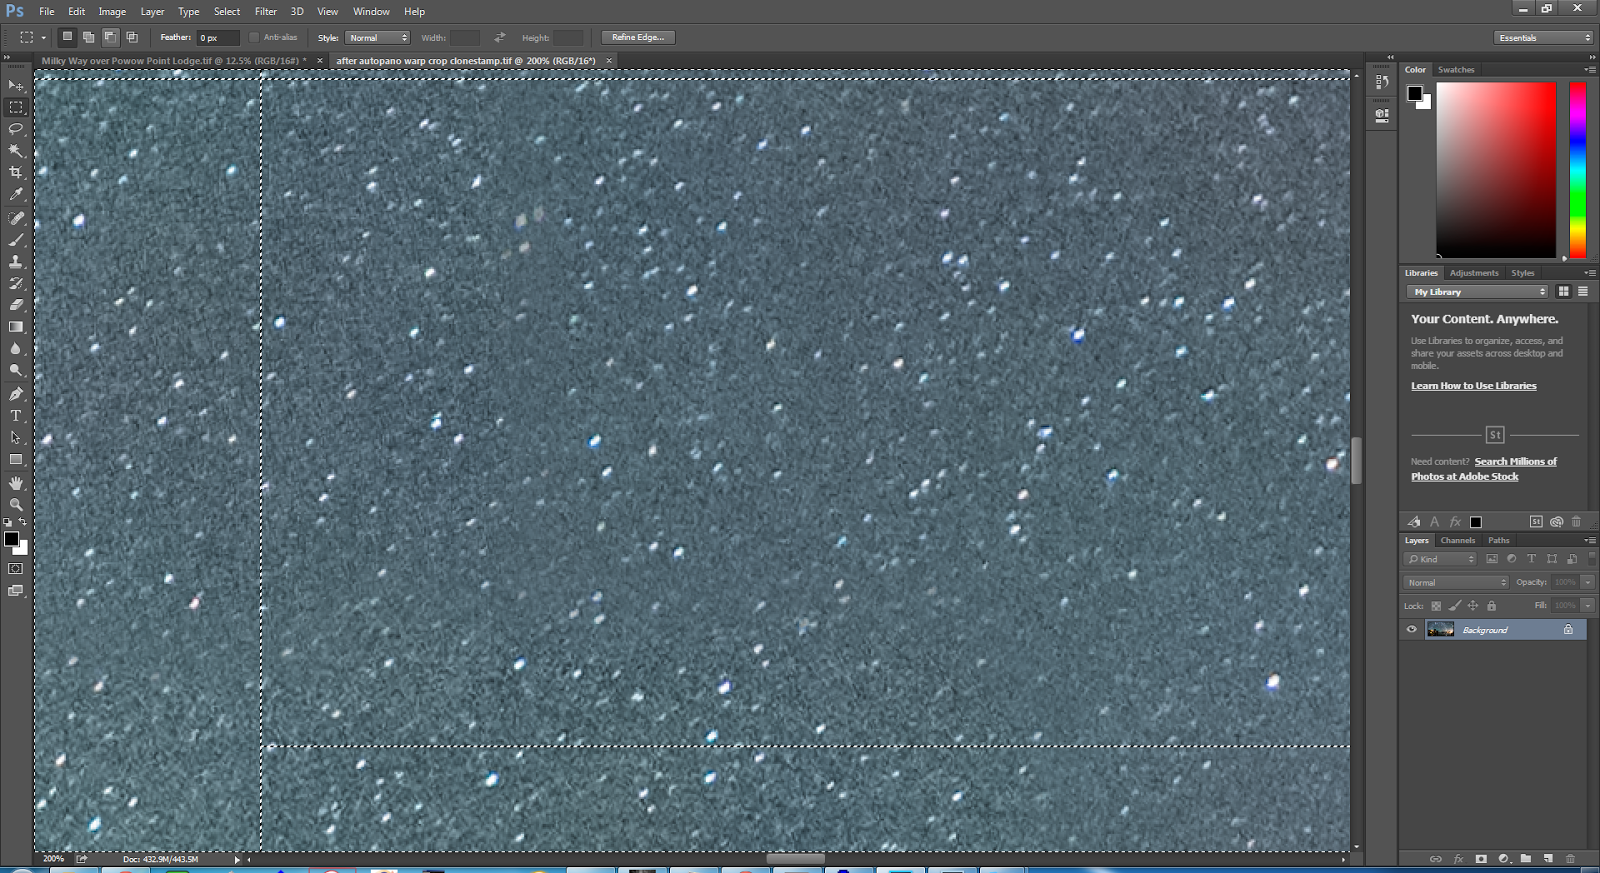
Next, I used Topaz Denoise Photoshop plugin to reduce the amount of background noise:

Before:

After

 Using the Magic Wand Tool, I select the sky:

I then created a separate sky layer (Ctrl-Shift-J) and made adjustments to both the sky and the ground layer (always using adjustment layers and converting them to Clipping Masks, so that they only affect the underlying layer):

There are still a number of things that I should improve:

  • the horizon is still not straight
  • there are some artifacts left of bad alignment (e.g. horizon in the middle)
  • I created some stripes in the upper right corner using the clone/stamp tool
But I'll leave that for future panoramas.