Sunday, June 28, 2015

Sunset Time Lapse

I think this is my first really good sunset time lapse:

Capturing

I used qdslrdashboard for controlling the camera. Unfortunately, it stopped working after 20 minutes or so - but at least it didn't disconnect like I experienced earlier. I wondered if it has to do with Androids scheduling mechanism and that it can't run well as a background app when the screen is dark. I chose the "keep screen on" option in qdslrdashboard and that seemed to fix it - of course that also means that the battery drains so much faster.

The whole capturing setup now consists of
  • the camera itself
  • the intervallometer (I take a photo every 30 seconds)
  • an Android phone or tablet running qdslrdashboard (connected to the camera either via USB or wifi)
  • a usb recharger for the Android device (which means I have to connect via wi-fi)
... oh, and the handwarmers strapped to the 14-24mm lens to avoid dew on the lens.

Once setup, it works very well and doesn't require any fiddling or such.

One issue that I encountered a couple of times was that qdslrdashboard stopped adjusting or completely disconnected from the camera (in either USB or wifi mode). I asked on the qdslrdashboard forum and the only idea was to use the "keep screen on" setting. Which works, but then the tablet/phone discharges really quickly. So, I have to use a USB recharger (and connect to the camera via wifi).

Processing

The latest version of LRTimeLapse made processing even easier. Now, you only do one pass (and not two as previously) between LRTimeLapse and Lightroom. I found that the key piece is the selection of the key frames:
  1. Need to make sure that I have key frames at all the "significant" moments. E.g. when the sky goes red, making sure that one key frame is in the middle of it to shift the white balance slightly to bring out the red more. LRTimelapse only allows to create n key frames at equidistant times in the video. I.e. often I have to choose to many to make sure that I have one that's at the right moment.
  2. At those key frames, I do careful manipulation of the images to create the transitions that I wanted. E.g. for this timelapse, these were my keyframes:

And this is how I edited them:

You can see that I changed them in a way that creates a consistent flow from bright to darker and preserve the color (in particular the blue sky).

LRTimelapse then takes these keyframes and interpolates all the images in between such that it creates a smooth transition. It also smoothes out the step function that was created when taking the images (qdsrldashboard always takes 3 images with the same exposure time and ISO and only then adjusts them if they are darker then the reference point).


In the photo overlay, you can see the different progressions:

  • dark blue: the original images (you can see the tooth saw curve, when qdslrdashboard adjusted the exposure time/ISO and you can also see that twice qdslrdashboard stopped adjusting (see above the disconnect issue)
  • yellow: the corrections
  • light blue: the resulting smooth progression from bright to dark.

Friday, June 26, 2015

First Milky Way Panorama

Our vacation in Canada gave me the opportunity to try out my first milky way panorama:
(click image for full resolution)

There are still some issues with it, but for a first try, I'm pretty happy. I used the great instructions from Mike Salway.

Capturing

Capturing the images turned out to be surprisingly easy. First, I needed to focus. I used a bright star (Atair in the Eagle) and used LiveView with maximum zoom. I played quite a while with it to make sure that I have the smallest possible star.
Next, I needed to make sure that no dew forms on the lens. The 14-24mm lens is sticking quite far out. I used some handwarmers that I fixed with one of Beth' hairbands :-)


Then I oriented the camera such that it captures some of the lake and the sky. Took one image. I needed to make sure that the images overlap sufficiently. With the Manfretto head, this wasn't a problem at all:

I just turned the horizontal knob and checked how much overlap I have. Turns out, I needed 10 turns for ~30% overlap. So, I did this all the way round. Then I moved the camera higher - making sure that there is overlap with the first layer. Now, I needed 15 turns for 30% overlap. Finally I move the camera almost all the way up and too 4 images from the zenith. These are the resulting images:

Processing

First, I loaded all images into Lightroom and made some basic adjustments (White Balance, Exposure...) I did it on one image and applied the same modifications to all other images: First in Develop Mode: Develop Settings -> Copy Settings) and then in Library mode Develop Settings -> Paste Settings.

Before:

After:

This is how all images looked afterwards:


Next, I need to merge all the images together. First, I wanted to try out if Photoshop's Photomerge can combine these images...

Well, that's rather tragic. Next, I tried Autopano (Giga):

Much better (I only need to adjust the horizon a little - although it's still not perfect).

Now in Photoshop, I first try to straighten the horizon and create a better arc of the milky way:

Next, I crop out the sides:

I fill in the corners with the clone/stamp tool and also erase the warped flag pole on the right:

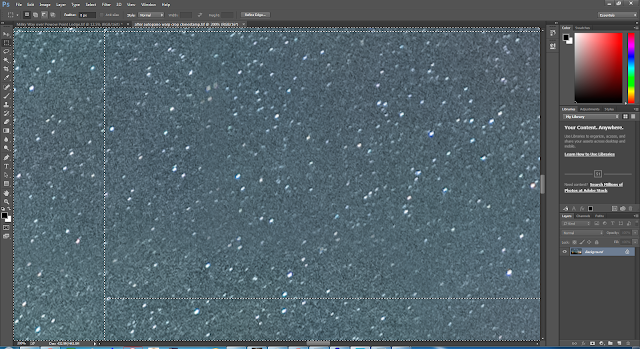
Next, I used Topaz Denoise Photoshop plugin to reduce the amount of background noise:

Before:

After

 Using the Magic Wand Tool, I select the sky:

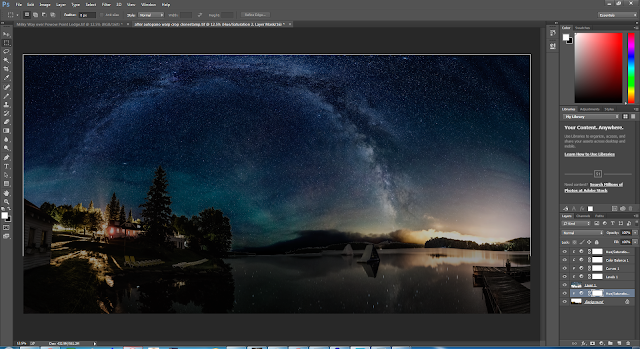
I then created a separate sky layer (Ctrl-Shift-J) and made adjustments to both the sky and the ground layer (always using adjustment layers and converting them to Clipping Masks, so that they only affect the underlying layer):

There are still a number of things that I should improve:

  • the horizon is still not straight
  • there are some artifacts left of bad alignment (e.g. horizon in the middle)
  • I created some stripes in the upper right corner using the clone/stamp tool
But I'll leave that for future panoramas.


Monday, June 22, 2015

Paramount MyT - Day 9 - Using Laptop, PHD2 finally works!!!

I want to use my laptop for imaging, so I needed to setup all the software (so far, there was only the processing software on it):
  1. Ascom Platform
  2. MyT
    • Install MyT driver
    • Install Ascom2XMount driver
    • Configure in TSX:
      • Set Park position
      • FOVI
      • Bad Samples setting
      • Configure COM port
      • ImageLink setup
    • SGPro:
      • Need to start TSX once as admin to allow it being invoked from other apps
      • Configure Ascom settings: Inhibit Syncs
    • PHD2:
      • configure Ascom settings: Enable Tracking offsets, Enable PulseGuiding, Can Get Pointing State
  3. Atik camera
    • Install Artemis package
  4. FLI
  5. Install Dimension 4 Time
  6. TPoint
    • Enter EXACT location and elevation (installed 2 Android apps for that!)
    • Setup Horizon
  7. CCDAutoPilot: copy license file, adjust paths
Took me a good deal of the day, but I was done by dawn. Yei!

First, I tried to capture dusk flats with CCDAutopilot. Worked REALLY well (actually seemed to be faster then with the NUC - I could almost capture 20x5 (Ha, SIII, OII, Lum, Red, Green, Blue) flats!!!

Then I started with setting up a new model from scratch:
  1. Home
  2. Closed Loop Slew to Arcturus, Sync
  3. 20 point model - adjust polar alignment
  4. 50 point model - adjust polar alignment
  5. 270 point super model - adjust polar alignment
  6. recalibrate portable to check polar alignment
Final PA:
MA: 1.1 arcsec (!!!)
ME: -53.7 arcsec

Then I wanted to use PHD2 to log tracking errors. But when I tried the initial calibration, I had the issue again that PHD2 didn't move the mount in the proper directions. Read through various forums again and it seemed as if people didn't enable PulseGuiding but DirectGuide. Did that - and then everything worked!!!

Tried to capture a new PE curve, but with the same results (PE got better - but only marginally). But while logging this, I could see that the tracking error was REALLY small (the guiding star stayed in the subframe during the 25 min run - and only moved a little).

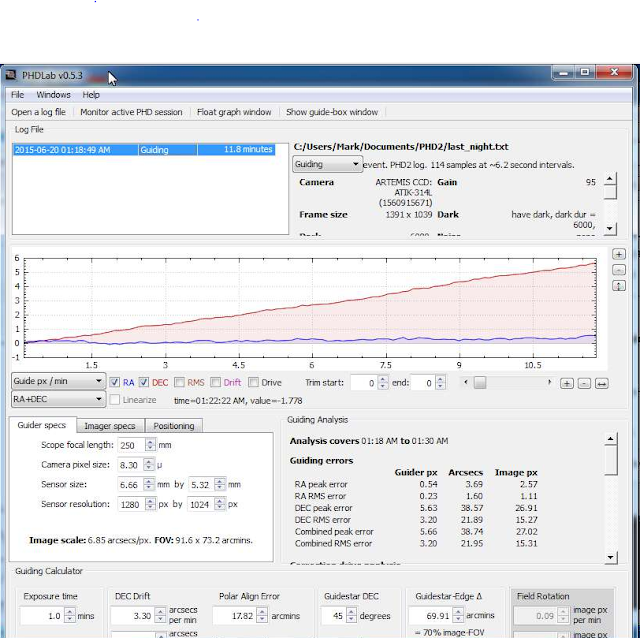
So, finally, I enabled guiding in PHD2 and let the mount run (had to go to bed). The next morning, I checked with PHDLab:

Clearly, I have to tune my guiding parameters in PHD2, but an RMS error of 0.7arcsec in 3+ hours isn't too bad.

Sunday, June 21, 2015

Paramount MyT - Day 8 - NUC issues (??!!), Running on battery, figured out "recal portable" issue!

I have the 12V->48V converter, connected it to Anderson poles and will try to run my mount off a 12V battery tonight
<image of battery, converter, plug>

When I started TSX, I tried using "recal portable" again - and this time it worked!!! And then it dawned on me: today, I had to install some Windows updates and restarted my computer. For that, I properly shutdown TSX. And apparenly, TSX stores a lot of state on shutdown!!! (Richard later confirmed that!) But after most nights, I just unplugged the NUC and didn't shutdown TSX and/or Windows.

I wanted to work more on my polar alignment issues from last night. I made sure to tighten all screws, tightened the cabling, And then did a good polar alignment (<1 arcsec error). I wanted to try the Lodestar guider to see if that makes a difference. But it's apparently hosed (couldn't get it reliably to work). So, I switched back to the Atik camera.

But when I tried to record tracking accuracy, clouds rolled in :-(

In other news: the mount still disconnected once. My guess is that the NUC has USB connection issues. Will try tomorrow to use my laptop. That's also good prep for the star party (want to use the laptop there - and not the

Saturday, June 20, 2015

Paramount MyT - Day 7 - Recal Portable & Polar Alignment Weirdness

Tried to figure out how to run my mount off 12V batteries. Need:
  1. A 12V -> 48V converter - on some discussion forum I was pointed to this one on eBay. Ordered it.
  2. I didn't know what type of connector I need. Posted on the Bisque forum and found out that it is a locking 2.5mm plug is. I have the non-locking version and will try that.
In the last couple of nights, a few times (once per night if at all) my mount suddenly disconnected from TSX. I asked on the TSX mailing list and got pointed to a post that details how to remove timeouts from USB connections. I did that on the NUC - will see if this fixes it.

After last nights experience (good tracking but lousy centering) I asked on the SGPro mailing list if it's possible to NOT do a sync after a plate solve. Jared replied that this might be working in one of the next versions of SGPro (they will not issue sync commands to mounts that can't handle sync commands). Though it's not clear if this will actually work (see thread) - will see.

Next, I tried the "recal portable" again and got the same error messages. Tim told me that it should work and that I might have deleted my super model by accident. I checked, and all the 200+ calibration points from the super model were still there. After I pressed "Super Model..." and (re?)built the super model, I could do a "recal portable" run without any problems. Strange!!! Somehow TSX lost my super model...

One remaining issue with Image Linking was that I often get an error message "The index is out of range. Error = 733." After fuzzing around (restarting, different order of calibration points...) it usually goes away. I asked Tim and Richard (Wright - one of the Bisque developers). Richard told me that it is the "Bad pointing sample criterion (degrees)" setting under "Advanced Settings". By default it's 0.5 degrees, but for portable mounts like the MyT it needs to be higher. It took me a looooooooooooooong time to find it. It's NOT in the ImageLink settings or in the TPoint settings, it's in the general Tools -> Preferences... -> Advanced settings. After I found it and set it it to 5.0 I didn't get one single instance of the "index is out of range" error. Yei!!!


Because I have to do a lot of star centering, I finally aligned my guide and main scope. The guide scope has a MUCH wider FOV (especially if I use the MLx694 camera) and if the star isn't in the main scope, chances are it's in the guide scope.

After last night's experience (good tracking, not good pointing) I wanted to focus on polar alignment. I did several iterations and got the PA errors down to 

MA: -32.1 arcsec
ME: -79.9 arcsec


Which looked good enough to me. But when I then just tracked and recorded the alignment error in PHD2, I got a 17.82 arcmin(!!) error:


Asked on the Bisque forum and also Tim and Richard. But couldn't get anything insightful...

Wednesday, June 17, 2015

Paramount MyT - Day 6 - Recal Portable

I wanted to try another unguided imaging. First, I needed to recalibrate the model. As our two dogs tend to bump into the mount during the day, my polar alignment is usually off. So, I was using the "Recalibrate Portable Telescope" option. Took a model of 20 points, then tried to do an accurate polar alignment, but got an error message that I haven't built a super model yet <need exact error message>! Weird, I don't think I should build another model, but that the recalibration just helps to calibrate the existing model again.

Tried this a couple of times - always with the same results. Finally gave up and built a new super model.

With this I tried to do more unguided imaging, this time on M27:

And zoomed in:

Again, pretty good guiding - but M27 wasn't centered at all. I guess it'd be great if I could use the "center" routine in SGPro - without impacting my TPoint model.

Sunday, June 14, 2015

Paramount MyT - Day 5 - Cabling and first unguided imaging

Today, I received the FLI cable <link> from Bisque and now can do the final cabling.
<photos from cabling>

Now, there is exactly one USB cable running from the mount to the computer!

With everything now together, I wanted to try my first unguided imaging. I took a model with 270+ points, had very good polar alignment. I then setup my sequence in SGPro (chose "slew"instead of "center", disabled guiding). I chose NGC 6888 (Crescent Nebula) as a first target. It was kind of weird to not have guiding on...

This was the first image:

and a zoomed in look:

Some streaks - but then I remembered that I didn't turn on ProTrack.

So, here is a later image:

And the zoom:

Slightly better. And for unguided actually really good. Very cool!!!

Saturday, June 13, 2015

Paramount MyT - Day 4 - Horizons, PEC and my first super model

When I recorded my models last night, many points failed as the scope was pointing into tress or our house. I read the TSX manual about how to set the horizon.

First: there are two horizons!!! One under Display -> Horizon & Atmosphere Options... and a second one under Telescope -> Telescope Limits. And it turns out that the TPoint Automated Calibration uses the first one!!!

I tried to draw the horizon manually, but that was WAY too difficult. Then I tried to use a similar mechanism as APCC and SkyTools use: point the scope at the border of the horizon and record it. But in TSX, you apparently can't point your scope at individual points and then connect them, but TSX is constantly recording! But I found it impossible to move the scope along a straight line. Weird!

I then turned to the method of capturing a photo, using it in Horizon & Atmosphere Options and draw the horizon based on that photo. First, I took a panoramic photo from where my scope is standing.

I needed to make the sky transparent. Loaded the photo into Photoshop, selected all the sky (and some of the cables in between)

When everything was selected (including all the small details), I inverted the selection and copy/pasted this into a new image with transparent background:

I copied this picture into the Horizons subdirectory in the TSX path and then I could select it in TSX:

Had to move and rotate the image to fit. Now comes the confusing part: just setting the horizon image isn't enough!!! I had to select "Custom Drawn" from the "Horizon Type" drop down. Then click "Create From Current Horizon Photo". Only then would the horizon be used as a restriction in Automated Calibration. This is the small part of the sky that I'm left with :-(

This should help with the Automated Calibration!!!

But I would like to see my photo again! So, I had to go back to "Horizon & Atmosphere Options" and select "Photograph" again. That would show my photo again - but leave the horizon restrictions for "Automated Calibration". Very confusing!

When it got dark, I first tried to redo the Polar Alignment. First, I did a rough PA: slewed to Polaris and then adjusted Azimuth and Altitude until it was centered. Next, I took a 40 point model and adjusted my Polar Alignment according to that model.

Now, I wanted to record the Periodic Error to create a PEC curve. Boy, that process is COMPLICATED in TSX!!! Have to disable everything (guiding, PEC, ProTrack...), then choose my main camera as the Guiding Camera, disable the Relays in the Autoguiding settings, enable logging the autoguiding data and finally select Autoguiding... This recorded the star movement. And the resulting file could finally be used for PE analysis. The PE is under Telescope Tab -> Tools -> Bisque TCS -> Periodic Error Correction tab -> Compute PEC Curve! Load the logfile and click "Fit":


and then "Curve fit to tracking data". And finally "Save to Mount".

Afterwards, I recorded another log, now with PEC enabled to measure the remaining error:

Hmmmmmmmmmm, this isn't too much better (2.3 arcsec vs. 2.8 arcsec).

I then wanted to use PEMPro to record and calculate a PE curve. But PEMPro didn't seem to record the correct frequency:
<screenshot of PEMPro>

So, back to TSX. I guess I need to record PEC from a better location and/or longer then 20 minutes!

Friday, June 12, 2015

Paramount MyT - Day 3 - Analyzing ImageLink and SGPro errors

First, I did some recabling to move the NUC off the scope. I connected all devices to the USB hub - except the FLI camera. Then I connected to the USB hub and the FLI camera to the USB outlets in the versaplate
<image of versaplate with USB cables>

And then just one USB cable from the scope to the NUC.
<image of NUC connected to scope>

After some setup, I first tried to figure out what is happening with the "center" command in SGPro. Checking the log file, I found the following exception:
<log file>

Turns out that the "Inhibit..." setting in the Paramount Ascom driver returns an exception when SGPro tries a sync after a Plate Solve. I checked if it's possible to turn that off, but couldn't find anything. I searched the SGPro forum and found a relevant discussion <link> and also a discussion in the Bisque forum <link>. Seems to be an incompatibility between TPoint/TSX and SGPro. I asked on the SGPro forum if it would be possible to add a setting that would avoid the sync after a Plate Solve and Jared replied that this should be fixed in the next version (where they will check if a mount can by sync'ed before issuing sync commands - yei!)

Next, I tried to figure out what was wrong with my plate solves in TSX. Earlier that day I talked to a friend who is using TSX and Paramounts for some time. He said that he can get very reliable plate solves with binning 4x4 and 5 sec exposures. And he is using the Red filter to allow him to plate solve even when it's not fully dark. I tried that (had to remember to set the scale to 4.88 arcsec/pixel because I'm binning 4x4!), but still had only a 20% success rate. In then did two model runs to improve my polar alignment, but that didn't help. Played with several ImageLink parameters - still no luck. Finally, I compared with SGPro. I loaded an image from TSX into SGPro and tried to plate solve - didn't work! Then I loaded an image that I could plate solve in SGPro into TSX - and it worked!!! So, it was the image capture itself.

... and finally when I compared the images directly I noticed that the TSX image was MUCH smaller. And when I looked in TSX's camera settings the "Subframes" checkbox was checked!!! AAAAHHHHHH!!! I unchecked it, took one image - and voila! Plate solved!

But now it was 3am and I need to go to bed.

Thursday, June 11, 2015

Paramount MyT - Day 2 - Polar Alignment, First try TPoint

Now, where the mount is connected, I wanted to start with doing some imaging. First, I needed to Polar Align the scope. Boy, am I used to the simple RAPAS alignment routine. Centering stars is tricky if you only have cameras and no red dot finder or such!

After trying to get at least a rough polar alignment done with the cameras I almost gave up and thought about mounting my red dot finder back on the scope. But then I remembered by DSLR connector that I have on top of the telescope - and its dovetail can be screwed into the red dot finder!!! So, I mounted it
<need picture>

Now, I could do a rough polar alignment. One thing I noticed is that my Azimuth alignment screws have a lot of backlash. Takes half a turn or so that I can change direction!!! :-(

In order to improve my polar alignment, I used good, old AlignMaster - with the red dot finder, it wasn't a problem at all. Yei!

From my posts on the PHD2 and Bisque forums I was guided towards the Ascom driver settings and that I need to enable PulseGuide and GetPositionFromMount.
<screenshot>

I enabled these, connected to PHD2 and tried to move the mount around - worked!!! Then I wanted to do run calibration. But every time the mount would go into the East direction. But then when PHD2 wanted to move the mount back West to the origin, it moved it orthogonal to the initial direction. When it then moved South, it moved almost exactly into the same direction as the East. And the final North movement didn't really do anything.
<screenshot of directions>

And after the calibration ran, PHD2 would warn that the RA and DEC movement look suspiciously non-orthogonal.
<error screenshot>

Asked about that again.

Next, I wanted to check how the mount works in SGPro. Connected everything and tried to run a sequence. But the center command didn't work. For some reasons, the mount never moved closer to the initial slew to the object
<screenshot>

Posted on the SGPro forum.

Finally, I wanted to try out TPoint. As it relies heavily on Plate Solving (which it calls ImageLink), I first tried that. When it works it's wickedly fast! But too often, it wouldn't work at all (doesn't find enough or any stars). I tried a number of things, but couldn't get it to work reliable. I even set the exposure time REALLY high, but still not. Now, it was really late again - time for bed.

Wednesday, June 10, 2015

Paramount MyT - Day 1 - Unpacking, Assembling, Connecting

I heard a lot of good things about the Paramount mounts (T-Point, ProTrack, Polar Alignment) that I bought a Paramount MyT. It has almost the exact same specification as my Astro-Physics Mach1 mount (load, size...) i.e. should be a good fit for my TOA-130 scope.

After less then a week(!!), the boxes arrived - 4 big boxes!
<picture>

Unpacking and assembling was super-easy. The mount is really well-made and comes in surprisingly few pieces.

When I put the counterweights and my scope on top, one of the pier extensions gave in!!! They seemed to be rather flimsy considering the amount of weight that they have to support. I moved them all in and move the mount horizontal with good, old paper under the legs!
<picture of legs>

One of the first things I noticed was the great altitude alignment: you can easily move it up to roughly where you need it and then do the fine alignment with the altitude screw. Moving the mount upwards with the screw requires some force - the altitude screw of the Mach1 mount was WAY easier to turn in comparison.
<picture of altitude alignment>

While I was setting this up, I suddenly noticed that the plate that the mount gets screwed in turned on the pier! I tied the 6 set screws some more (some were a little loose) - hopefully that won't happen again.

Once I had everything mounted, I wanted to try the (super simple!) handcontrol. But it didn't do anything. I switched the mount off and on, unplugged the hand control... And finally read the manual: I have to home the mount first (that's very different from the Mach1).

Homing can only be done from TheSkyX. So, I tried to connect, but couldn't find the MyT mount in the list of mounts (only all other Bisque mounts). Turns out, I needed the latest version of TheSkyX for that. Installed it, now I could see the MyT mount! But when I tried to connect, it threw an error. Reading the manual again, it needed a driver. I plugged the USB stick that came with the mount into the NUC computer and installed it. Tried again, and again an error!!! It's a little misleading: the mount has a USB port and connects to a USB port. But internally, it still uses a serial port and hence needs to know on which COM port it needs to connect! Once I set it, I could connect to the mount and TSX immediately asked me if I want to home the mount. I said yes, and the scope turns into the homing position. Now I could use the hand control to move the mount/scope around.

Next, I wanted to connect the mount to SGPro and PHD to see if they work with it. I needed a new Ascom driver for the MyT mount. Installed that one and then I could select it from the list of mounts in both programs. Important to remember: the both connect to TheSkyX!!! I.e. I always have to keep it running - otherwise the mount wouldn't work.

By now, it was pretty late, so I just wanted to check if I can move the mount around. Worked easily in SGPro. In PHD2, I tried to calibrate the mount, but it didn't move. At all!!!

... now it was 2:30am - and I needed to go to bed!!!

Sunday, June 7, 2015

Getting out faint details of galaxies - from my light polluted backyard.

This spring, I tried imaging galaxies again. And with lots of imaging time (30-50 hours), I get a decent image with even some faint details. But when I process these, I always loose a lot - mostly when fighting with the noisy background.

Two examples:

M101

HaRGB image (after DBE, BackgroundNeutralization, ColorCorrection):

And after processing

M106

RGB image (again, after DBE, BackgroundNeutralization, ColorCorrection):

And after processing:

I am pretty happy with the background, the stars and the galaxy details itself. Just that I lost a lot of the faint outer details.

My process here is:
  1. TGVDenoise
  2. MaskedStretch
  3. Further stretch with HistogramTransformation
  4. ACDNR (I usually have some blobs left from TGVDenoise)
  5. HDRMultiscaleTransform (to bring out some of the inner details)
  6. CurvesTransformation

M13 - My first globular cluster!

Weird - after almost 3 years, I took my very first image of a globular cluster:

(click on image for a high-resolution version)

This is M13 - detected by Edmund Halley in 1714. It is 145 light years in diameter and is about 25,000 light years away from earth.

In 1974, we sent a message (the so called Arecibo Message) to this cluster. It was designed by Dr. Francis Drake and Carl Sagan. It consisted of:

  1. The numbers one (1) to ten (10)
  2. The atomic numbers of the elements hydrogencarbonnitrogenoxygen, and phosphorus, which make up deoxyribonucleic acid (DNA)
  3. The formulas for the sugars and bases in the nucleotides of DNA
  4. The number of nucleotides in DNA, and a graphic of the double helix structure of DNA
  5. A graphic figure of a human, the dimension (physical height) of an average man, and the human population of Earth
  6. A graphic of the Solar System indicating which of the planets the message is coming from
  7. A graphic of the Arecibo radio telescope and the dimension (the physical diameter) of the transmitting antenna dish

It will take 25,000 years until this message reaches the cluster and (unless civilizations there have developed technologies that allow them to travel faster then light) will take another 25,000 years until we might hear back.

A cropped version:

Data Collection was surprisingly easy. These are just 10x10min exposures in RGB (no Luminance!)

Processing in Pixinsight was easy too:
  1. Used the BatchPreprocessing script to create RGB images
  2. Combined with LRGBCombination
  3. Gradient removal with DBE (3 times!)
  4. BackgroundNeutralization and ColorCorrection
  5. Stretched with MaskedStretch (to avoid stars growing)
  6. Further stretch with HistogramTransformation
  7. HDRMultiscaleTransformation (before, the core was overblown)
  8. Final stretch (RGB, Lightness, Saturation) with CurvesTransformation
Not bad...